How to use Logpoint pySigma Backend for threat detection
There’s no doubt that open-source projects are immense contributors to the software ecosystem. With an extensive and active community of independent programmers worldwide, including cybersecurity professionals. They can exchange knowledge that helps develop new ways of detecting and mitigating new threats but it also speeds up solutions to other cybersecurity issues. Now, Logpoint customers can expand their detection ability with the latest security alerts thanks to Sigma.

What are Sigma Rules
Sigma is an open standard designed to streamline the process of writing detection rules for log files in a flexible, platform-agnostic format. As an open-source project, it thrives on collaboration from security professionals, particularly detection engineers, who contribute high-quality rules aimed at identifying malicious activity and emerging threats. Today, over 3,000 detection rules are available, each written in YAML format and following a standardized structure.
Enterprises collect vast volumes of log data and store it in centralized systems such as Logpoint. While these systems generate alerts from the data, they often rely on vendor-provided detection components, which can cause delays in threat response and create dependency. That’s where Sigma changes the game. Sigma's rules are open-source and accessible for everyone, so even customers can bring them straight into their SIEM, allowing for faster, more efficient threat detection—without the need for vendor content.
Introducing the Logpoint pySigma Backend
However, one of the main issues is compatibility. pySigma translates Sigma rules into platform-specific queries to make them compatible with specific security platforms. To add to this complexity, each SIEM has its unique query language. Hence, each manufacturer requires a modular, independent backend that reads Sigma's detection logic and converts it to the appropriate SIEM query syntax.
In an effort to bring our customers closer to the open-source community, we’ve recently added Logpoint pySigma Backend support in the pySigma. Now, it’s possible to convert Sigma rules into queries that Logpoint SIEM can execute to detect security events. With this backend in place, Logpoint users can seamlessly implement Sigma rules for threat detection, effortlessly expanding their capabilities and enhancing their security posture.
The Logpoint backend only supports the following log sources/rule types:
- Windows Sysmon
- Windows
We will be adding support for other log sources in the upcoming days.
Benefits of using Logpoint pySigma Backend
With the release of this backend, here are the immediate benefits you can get as a Logpoint customer.
- Streamlined Query Translation: Automatically converts Sigma detection logic into Logpoint-compatible queries, eliminating the need for manual translation.
- Enhanced Threat Detection: Leverage Sigma's rich rule set to improve Logpoint’s ability to detect and respond to threats.
- Ease of Use: Even users with minimal technical knowledge can apply advanced threat detection rules in Logpoint without vendor-specific dependencies.
- Future-Proof Security: Stay ahead of emerging threats by continuously implementing new Sigma rules as they become available.
- Time Efficiency: Save time by utilizing a ready-made backend that simplifies the integration of detection rules directly into Logpoint.
- Independence: Logpoint has been regularly releasing the Logpoint Alert Rules, which include alert rules for new emerging threats while also improving the quality of pre-existing rules. With this backend, Logpoint customers can independently update themselves to the latest threats by transforming the quality Sigma rules into Logpoint alerts.
Usage
Here are two alternative ways to convert Sigma rules into a Logpoint query and use them for alerts:
Using SigConverter (Web-Based Tool)
- You can navigate to the sigconverter website. Upon visiting the page, you will see a page like the screenshot below.
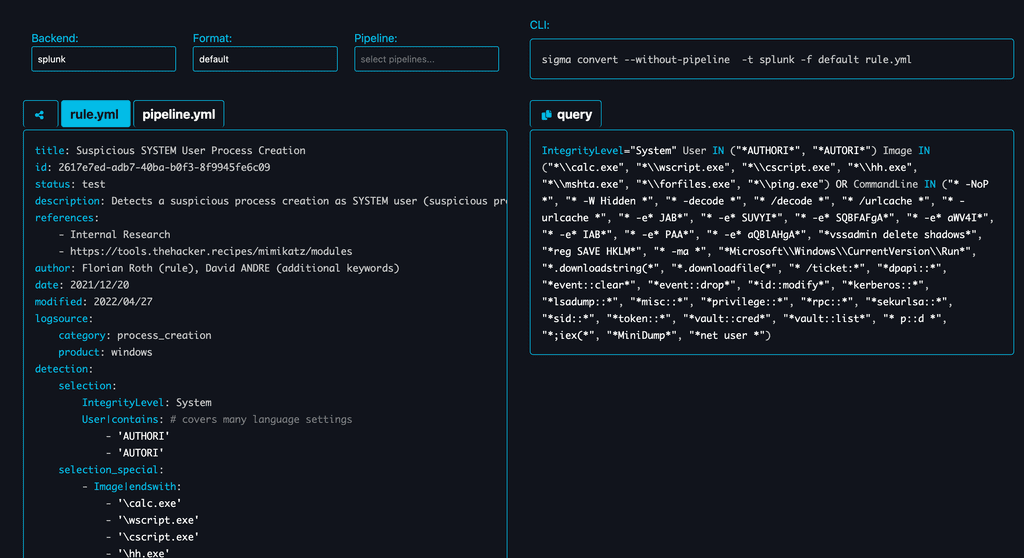
- Select the Backend:
-
- On the top-left of the page, you’ll see a dropdown box for choosing the backend.
- Click on the dropdown, and a list of backends will appear.
- From the options, select “logpoint” as your backend.
- Leave the Format unchanged.
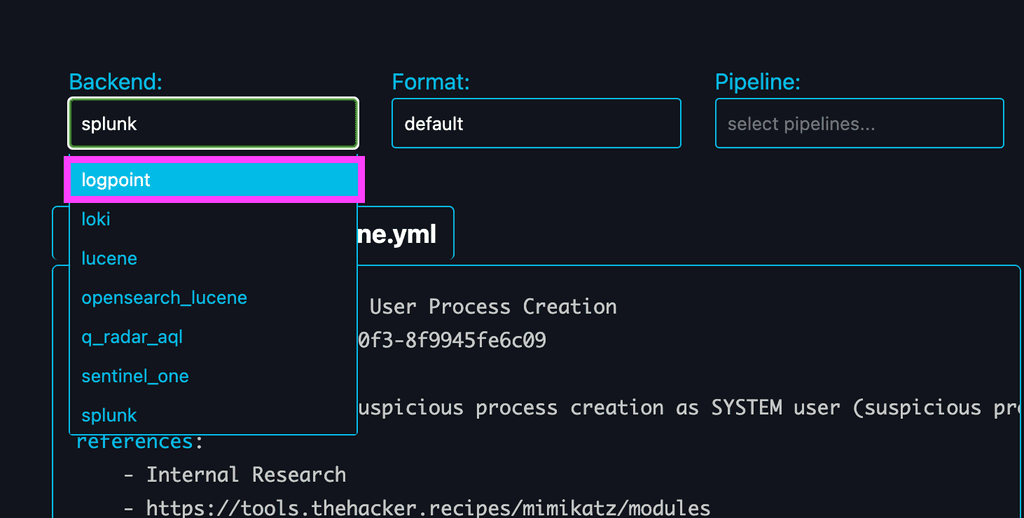
-
Choose the Pipeline:
- Adjacent to the Backend and Format dropdown menus, you’ll find a section labeled “Pipeline.”
- Use the search bar to enter “logpoint” and filter the available pipelines.
- From the results, select the “logpoint_windows” pipeline.

-
Once you’ve selected the pipeline, the transformed Logpoint query will instantly appear on the right side of the page.
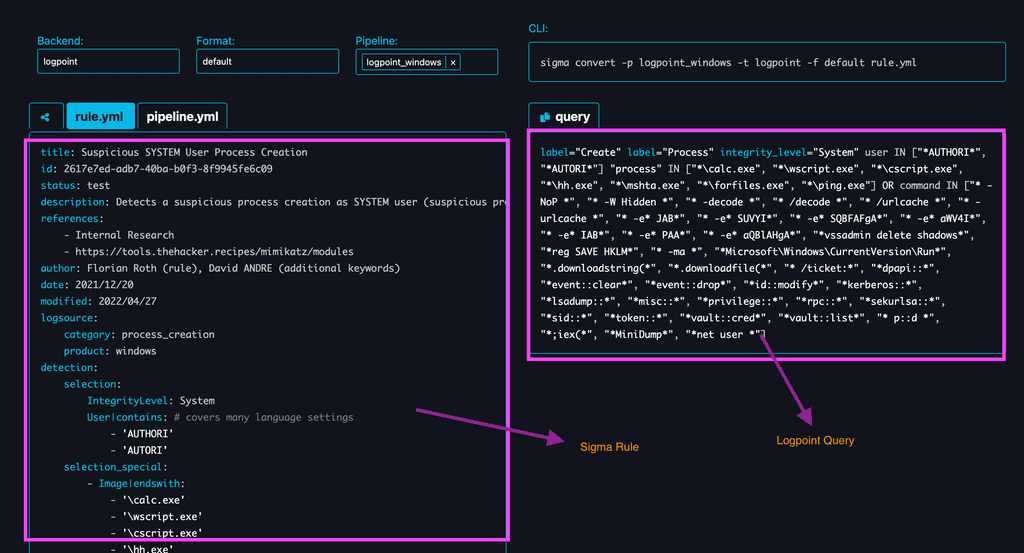
-
To convert a specific Sigma rule, visit the Sigma GitHub repository and select your preferred Sigma rule. Replace the default Sigma rule on the SigConverter website with the one you’ve chosen. For example, if you want to convert the Suspicious Process Masquerading As SvcHost.EXE rule, copy it from GitHub and paste it into the Sigma rule box on SigConverter.
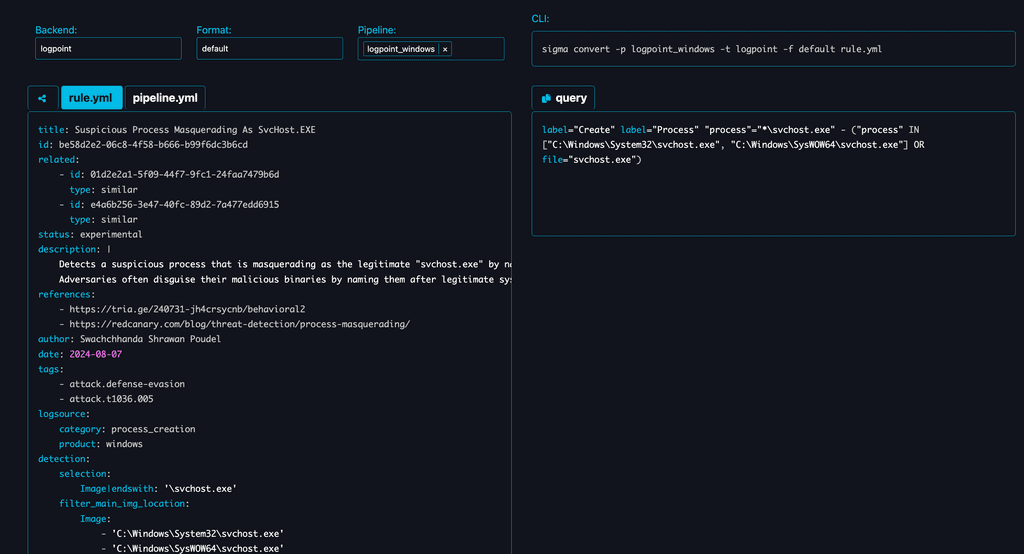
-
After pasting your desired Sigma rule, SigConverter will automatically generate the corresponding Logpoint query on the right side, ready to use in Logpoint Alert.
Using the Sigma CLI
Requirements
- To use Sigma CLI (the Sigma Rule Converter) and its underlying library, ensure you have installed Python version 3.8 or higher.
- Install dependent pysigma version 0.11.13. Installing other versions may output errors.
-
Install sigma-cli, a command line tool for sigma rule conversion
-
After installing Sigma CLI, you need to add the Logpoint backend plugin. Choose one of the following methods:
OR
Converting Sigma Rules
Once the packages are successfully installed, you can convert Sigma rules into Logpoint queries using the command below. For example, to convert the Suspicious Process Masquerading As SvcHost.EXE
Output

Creating an Alert in Logpoint
After converting the Sigma rule:
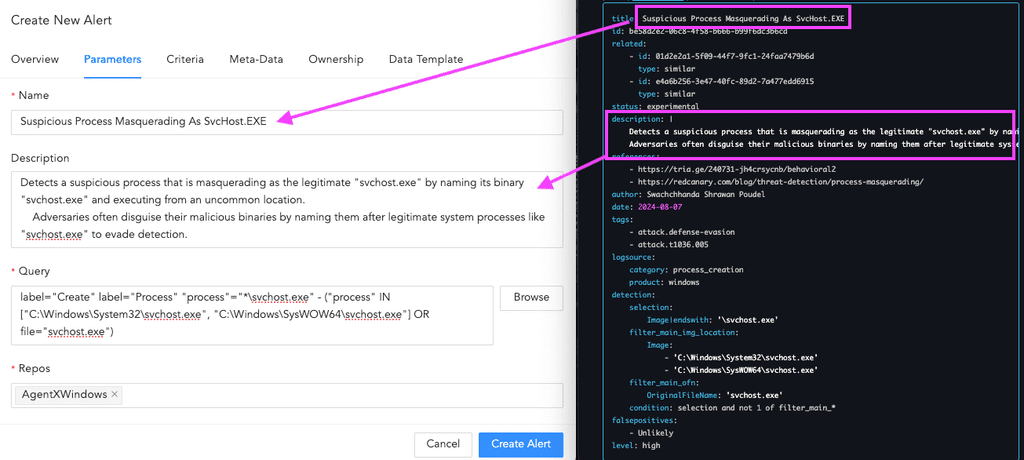
- Navigate to Logpoint's “Alert Rules” section.
- Create a New Alert:
- Name: Use the Sigma rule's name or your preferred name.
- Description: Use the Sigma rule’s description or customize it.
- Paste the Translated Query into the query field.
-
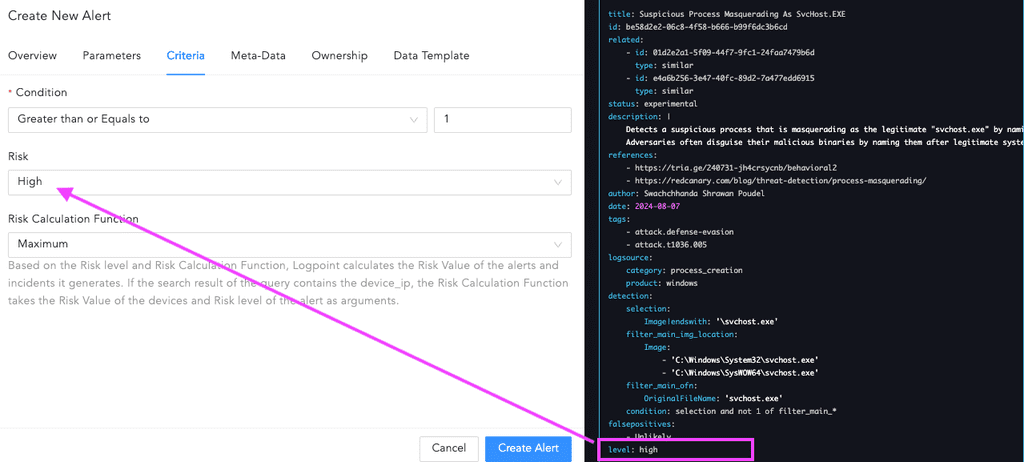
Configure the criteria
After configuring data in parameter section, proceed to configure conditions and risk level in criteria section. Set the condition to "greater than or equal to 1" to ensure that the alert triggers based on the specified threshold. Map the risk_level with the level fields from Sigma.
-
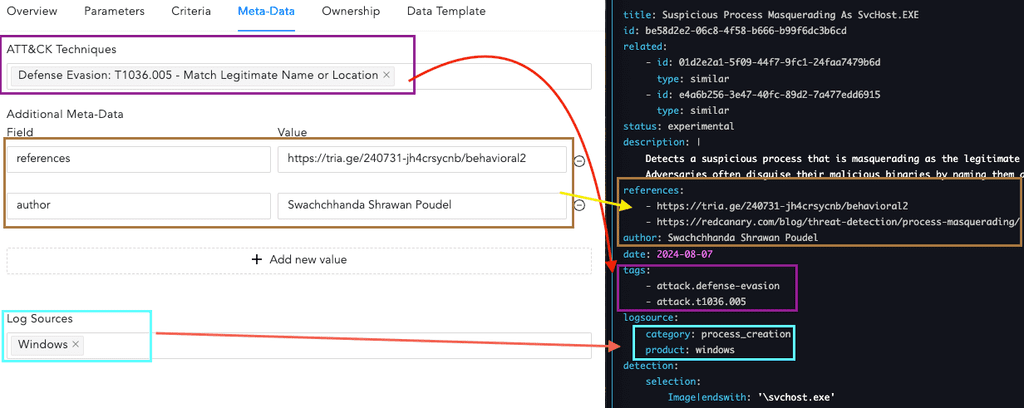
Configure the Metadata
Further, the alert's metadata can also be mapped with fields from the Sigma rule. The ATT&CK techniques field is mapped with tags field of the Sigma rule. Log Sources can be mapped with the product of logsource object of the Sigma rule. Additional metadata fields like authors and references can also be added.
-
Now that everything has been configured, the alert is ready for creation and deployment.

-
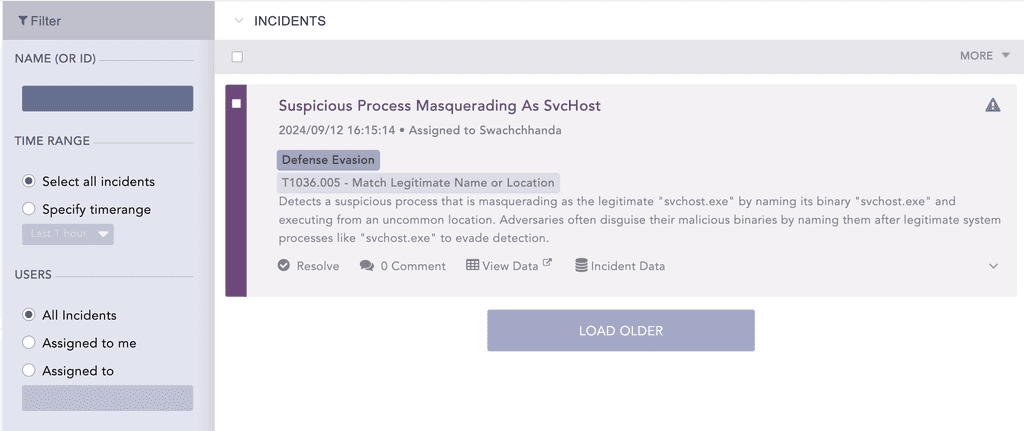
Once active, the alert will monitor for the specified events, and as soon as a related event is detected, it will trigger an incident.
Conclusion
Following these steps, you can seamlessly convert Sigma rules into Logpoint queries and configure alerts to enhance your threat detection capabilities. With proper mapping of fields, conditions, and metadata, your alert will be fully equipped to trigger incidents as soon as relevant events are detected, improving the overall security posture and responsiveness of your environment.
Report Issues
If you experience any problems, you can always open a new issue in the GitHub project Logpoint backend for pySigma.


